

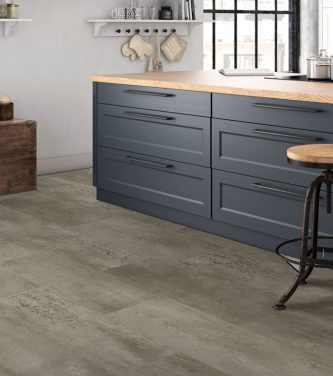
Expressa Vinyl Plank – Easy Installation Meets Modern Design
Expressa Vinyl Plank is a DIY-friendly click flooring system designed for quick installation and everyday durability. With realistic wood visuals, a waterproof core, and a comfortable feel underfoot, it’s a great option for busy homes that want style without the stress.
In this guide, we’ll explain what makes Expressa different and walk through the basic steps of installing it in your home.
 What Is Expressa Vinyl Plank?
Expressa Vinyl Plank is a floating floor system that uses a click-together mechanism to lock each plank in place. Instead of adhesive, the floor “floats” over the subfloor, with the planks connected to each other rather than being glued down.
Many Expressa products include:
- Waterproof core construction for added peace of mind
- Integrated underlayment for sound reduction and comfort
- Textured surfaces that mimic natural wood grain
- Click-lock installation that’s ideal for DIYers
Where Expressa Works Best
- Living rooms and family rooms
- Bedrooms and hallways
- Kitchens and dining areas
- Basements (within manufacturer moisture guidelines)
- Rental properties and secondary suites
Why Choose Expressa Vinyl Plank?
- Easy installation – Click-lock system is ideal for DIY projects.
- Waterproof design – Great for areas that see spills and everyday messes.
- Comfortable underfoot – Softer and warmer than tile.
- Attractive visuals – Modern colours and realistic wood patterns.
- Low maintenance – Simple, straightforward cleaning routine.
Tools & Materials You’ll Need
- Utility knife or saw suitable for vinyl plank
- Measuring tape
- Pencil and straightedge
- Rubber mallet
- Tapping block and pull bar
- Spacers for expansion gaps
Subfloor Requirements
As with any floating floor, the subfloor beneath Expressa must be flat, clean, and dry. Planks lock together best when the surface below them is even and stable.
Your subfloor should be:
- Flat – within the manufacturer’s tolerance for height variation.
- Clean – free of dust, debris, adhesive residues, and protruding fasteners.
- Dry – moisture content must meet product requirements, especially over concrete.
- Structurally sound – no loose boards, soft spots, or squeaks.
Expressa can often be installed over plywood, OSB, concrete, existing vinyl, and some existing hard surfaces. Always verify that the existing floor is suitable and level before proceeding.
Step 1: Check Acclimation Requirements
Some rigid vinyl products have minimal or no acclimation requirements, while others should sit in the installation area for a period of time. Check the Expressa packaging or installation sheet for specific instructions and follow them carefully.
Step 2: Plan the Layout
Decide which direction you want the planks to run. Many installers choose to run planks parallel to the longest wall or in the direction of the main light source.
Measure the room to determine the width of the first and last rows. If the last row will be very narrow, trim the first row so that both starting and finishing rows are a more balanced width.
Step 3: Install the First Row
Place spacers along the starting wall to maintain the required expansion gap (typically around 1/4", but always check the manufacturer’s recommendation).
Lay the first plank with the tongue side facing the wall. Add additional planks end-to-end by clicking the short ends together, ensuring the seams are tight and straight.
Step 4: Continue with Subsequent Rows
Begin the second row with a cut piece so that the end joints are staggered from the first row. A minimum stagger of 8"–12" is common, but follow the guidelines supplied with the flooring.
To connect planks, angle the tongue of the new plank into the groove of the installed plank and rotate it down until it locks in place. Use a tapping block and rubber mallet where needed to gently tighten the joints. Avoid striking directly on the plank edges.
Step 5: Fitting the Last Row
Measure the remaining gap for the final row, accounting for the expansion space. Cut planks to width and use a pull bar to click them into place while maintaining the gap at the wall with spacers.
Once all planks are installed, remove the spacers and reinstall baseboards or add quarter-round to cover the expansion gap.
Care & Maintenance
Expressa Vinyl Plank is designed to be low maintenance, making it perfect for busy homes. A simple cleaning routine will keep your floor looking great for years.
- Sweep or vacuum regularly using a hard-floor setting.
- Damp mop with a vinyl-approved cleaner when needed.
- Avoid steam mops, waxes, or abrasive cleaners.
- Use felt pads under furniture feet and protective mats at entryways.
With its combination of easy installation, modern appearance, and resilient performance, Expressa Vinyl Plank is an excellent choice for homeowners looking to upgrade their space with a floor that can stand up to everyday life.